 |
| Yesterday, I went to Stella Niagara Educational Park for a painting class. This time, the instructor, Virginia Kelley, offered a lesson on negative painting. This is an exciting technique for watercolor painting that adds a great deal of depth to the painting. Instead of painting the objects, you are painting the space around the objects. Virginia suggested that we make our paintings somewhat smaller than usual, so we each used a half-sheet of watercolor paper. Virginia took us through the process, step by step, which I really appreciated because I have difficulty remembering multi-step directions. The first thing that she had us do was to draw a picture of one daisy. Also, we needed to draw the stem. The stem comes from the center of the daisy, so if the daisy is off center, which is what Virginia suggested, the location of the daisy should indicate that. Having an off-center daisy is visually more appealing because it suggests movement. There is my daisy, above. |
 |
| The next step is to make a blue wash. For this, you will put blue watercolor paint on whatever item you are using to mix paint. Add lots and lots of water to your paint because this wash should be light. Cover everything except the flower with the blue wash. You can cover the stem, too. After that, add some spots of color. |
 |
| Before you go on to the next step, your painting must be completely dry. One way to dry it is to use a blow dryer. After drying the painting, darken the lines that indicate a stem and extend the lines off the paper. |
 |
| You will now draw in two more flowers and a few leaves. |
 |
| Mix a darker shade of blue and paint around the outlines of the flowers and the stems and the leaves. You have added your second wash. Once again, thoroughly dry the painting. Once the painting is dry, you could add a few more things: some flowers that have not opened yet and a butterfly or a bee. |
 |
| At this point, you could use a darker blue or a different color for a third wash. I chose purple. |
 |
| At this point, you may want to lighten some of the leaves. A magic eraser sponge does a great job in getting rid of excessive pigment on your painting. |
 |
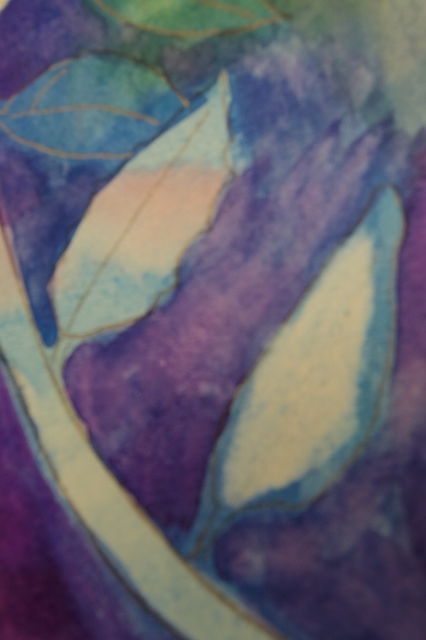
| Now you're at the cleaning up stage. Paint around the edges of all of your objects: flowers leaves, stems, butterfly, etc., so that you can have crisp lines. Add the veins to the leaves. |
 |
| To give more depth to the leaves, add some color, but not too much. Make sure to be gentle about adding color at this point. Also add some detail to the butterfly. One of the challenges of painting is knowing when to stop painting to prevent your creation from being overworked. This is a good place to stop. The only thing left to do is to sign your painting. You can photograph it and share the pictures with all of your friends. After a week or so, the painting will be thoroughly dry and the colors will shine even more than they do after your painting is just finished. |
That is lovely. You did a great job! Do you plan on framing it?
ReplyDeleteThank you very much. Yes, I think that I will frame it.
Delete